


Najlepšie riešenia na opravu problému „Nedá sa overiť identita servera“ pre iPhone
iPhone je známy svojim plynulým a bezpečným používateľským rozhraním, ale ako každé inteligentné zariadenie, ani on nie je imúnny voči občasným chybám. Jedným z najmätúcejších a najbežnejších problémov, s ktorými sa používatelia iPhonu stretávajú, je obávaná správa: „Nedá sa overiť identita servera.“ Táto chyba sa zvyčajne zobrazuje pri pokuse o prístup k e-mailu, prehliadanie webovej stránky v prehliadači Safari alebo pripojenie k akejkoľvek službe pomocou protokolu SSL (Secure Socket Layer).
Táto správa sa zobrazí, keď sa váš iPhone pokúša overiť SSL certifikát servera a zistí niečo v neporiadku – či už certifikát vypršal, nezodpovedá certifikátu, je nedôveryhodný alebo ho zachytila tretia strana. Hoci sa to môže zdať ako bezpečnostný problém, často je to spôsobené menšími nastaveniami alebo problémami súvisiacimi so sieťou.
V tejto príručke sa dozviete najlepšie riešenia na vyriešenie problému „Nedá sa overiť identita servera“ na vašom iPhone a na opätovné zabezpečenie bezproblémového fungovania všetkého.
1. Populárne a účinné riešenia na vyriešenie chyby „Nedá sa overiť identita servera“ na iPhone
Nižšie uvádzame niekoľko účinných riešení, ktoré môžete vyskúšať – od rýchlych reštartov až po podrobnejšie úpravy.
1) Reštartujte svoj iPhone
Začnite jednoduchým reštartom – potiahnutím prsta vypnite iPhone, počkajte niekoľko sekúnd a potom ho znova zapnite.
Prečo to funguje: Dočasné softvérové chyby môžu niekedy narušiť overovanie SSL certifikátov.
2) Prepnúť režim v lietadle
Potiahnutím prstom nadol otvoríte
Riadiace centrum
, klepnite na
Režim v lietadle
ikonu, počkajte 10 sekúnd a potom ho vypnite.
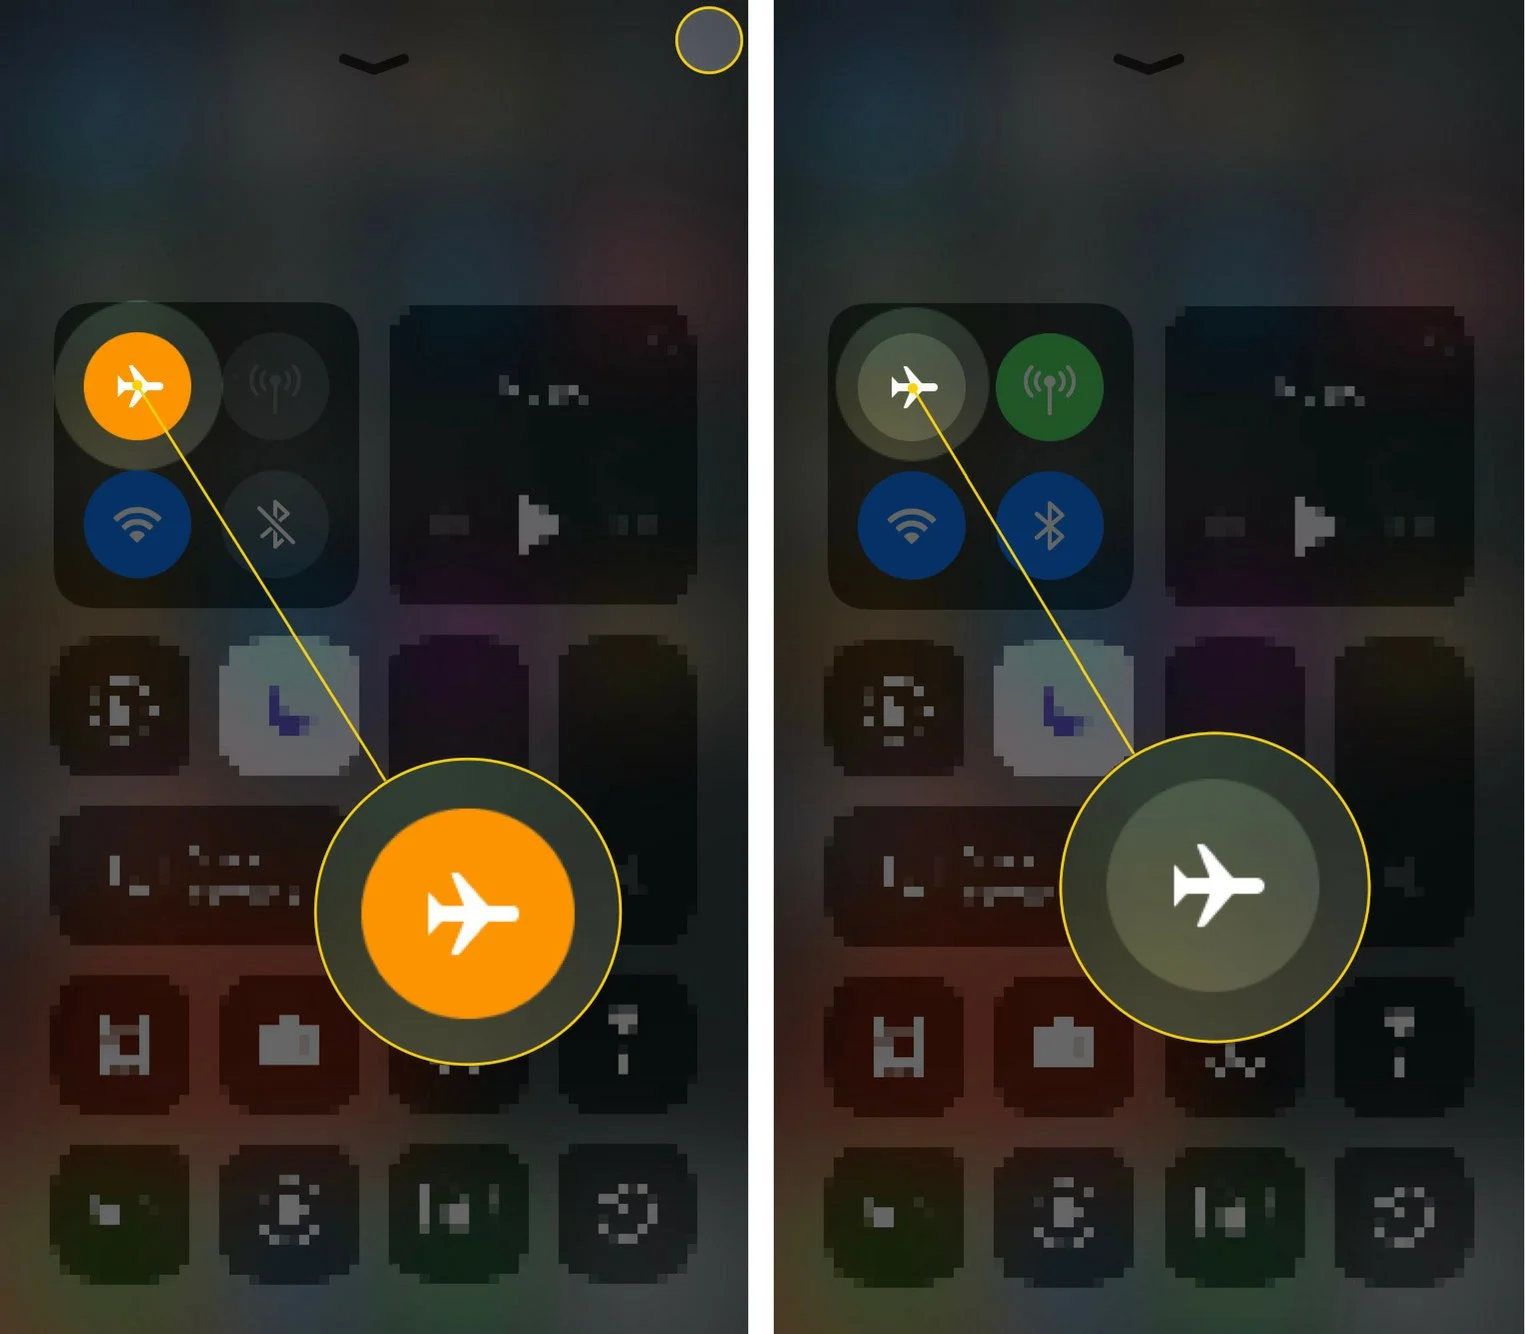
Táto akcia resetuje vaše pripojenie, čo môže vyriešiť problémy súvisiace s overením servera.
3) Aktualizujte iOS na najnovšiu verziu
Aktualizácie od spoločnosti Apple často zahŕňajú vylepšenia zabezpečenia a certifikátov – stačí prejsť na
Nastavenia > Všeobecné > Aktualizácia softvéru
a klepnite
Stiahnite si a nainštalujte
ak je nejaký k dispozícii.
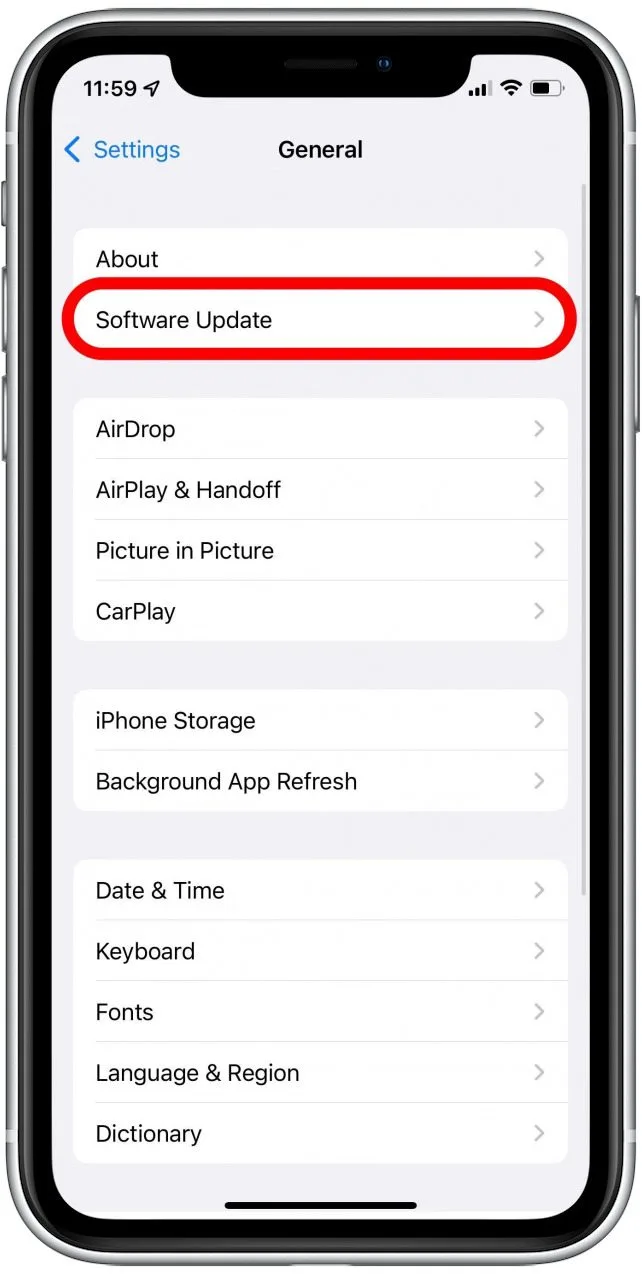
Prečo to funguje: Zastarané verzie systému iOS nemusia rozpoznať aktualizované alebo nové certifikáty SSL.
4) Odstránenie a opätovné pridanie e-mailového účtu
Ak sa v aplikácii Mail zobrazuje tento problém, skúste odstrániť účet a znova ho pridať.
Prejsť na
Nastavenia > Pošta > Účty
, vyberte problematický účet a klepnite na
Odstrániť účet
, potom sa vráťte do
Pridať účet
a zadajte svoje prihlasovacie údaje.
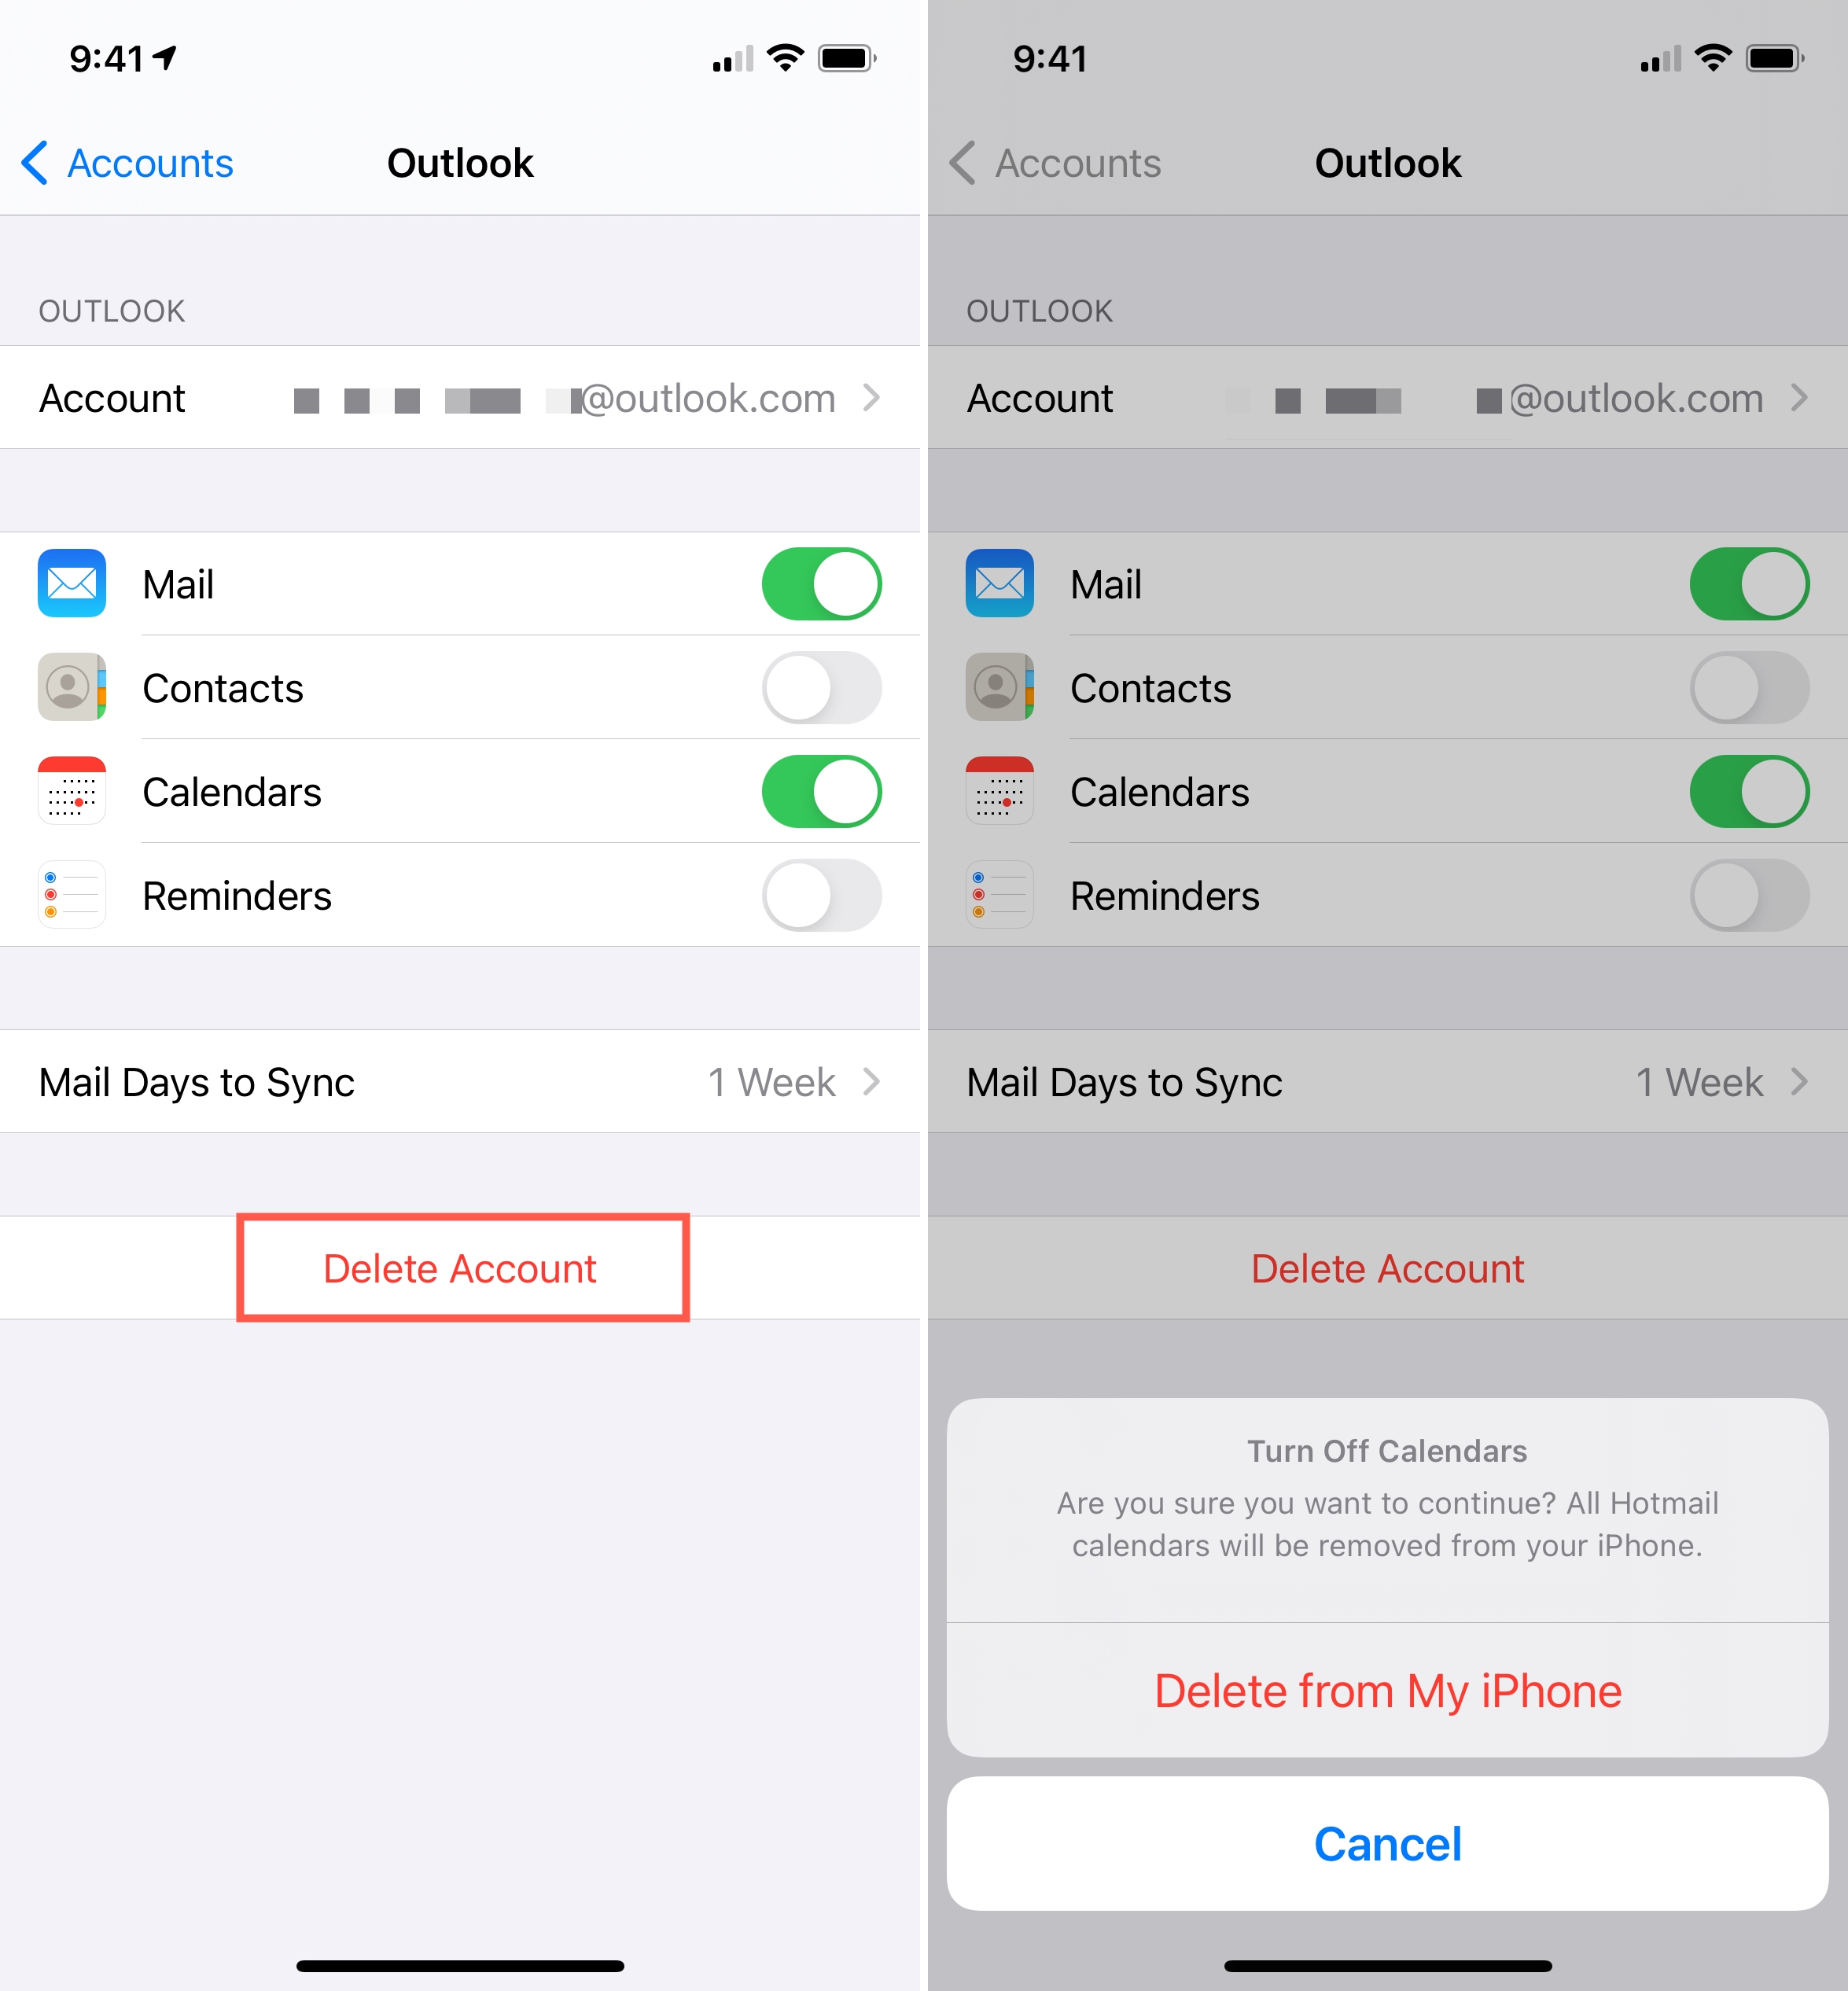
Prečo to funguje: Poškodená alebo zastaraná konfigurácia e-mailu môže spôsobiť nezhody SSL. Opätovným pridaním sa to vymaže.
5) Obnoviť nastavenia siete
Nastavenia siete zohrávajú dôležitú úlohu v komunikácii SSL.
- Prejdite na Nastavenia > Všeobecné > Prenos alebo reset iPhone > Obnoviť > Obnoviť nastavenia siete .

Týmto sa vymažú uložené siete Wi-Fi a nastavenia VPN, preto sa uistite, že máte tieto informácie zálohované.
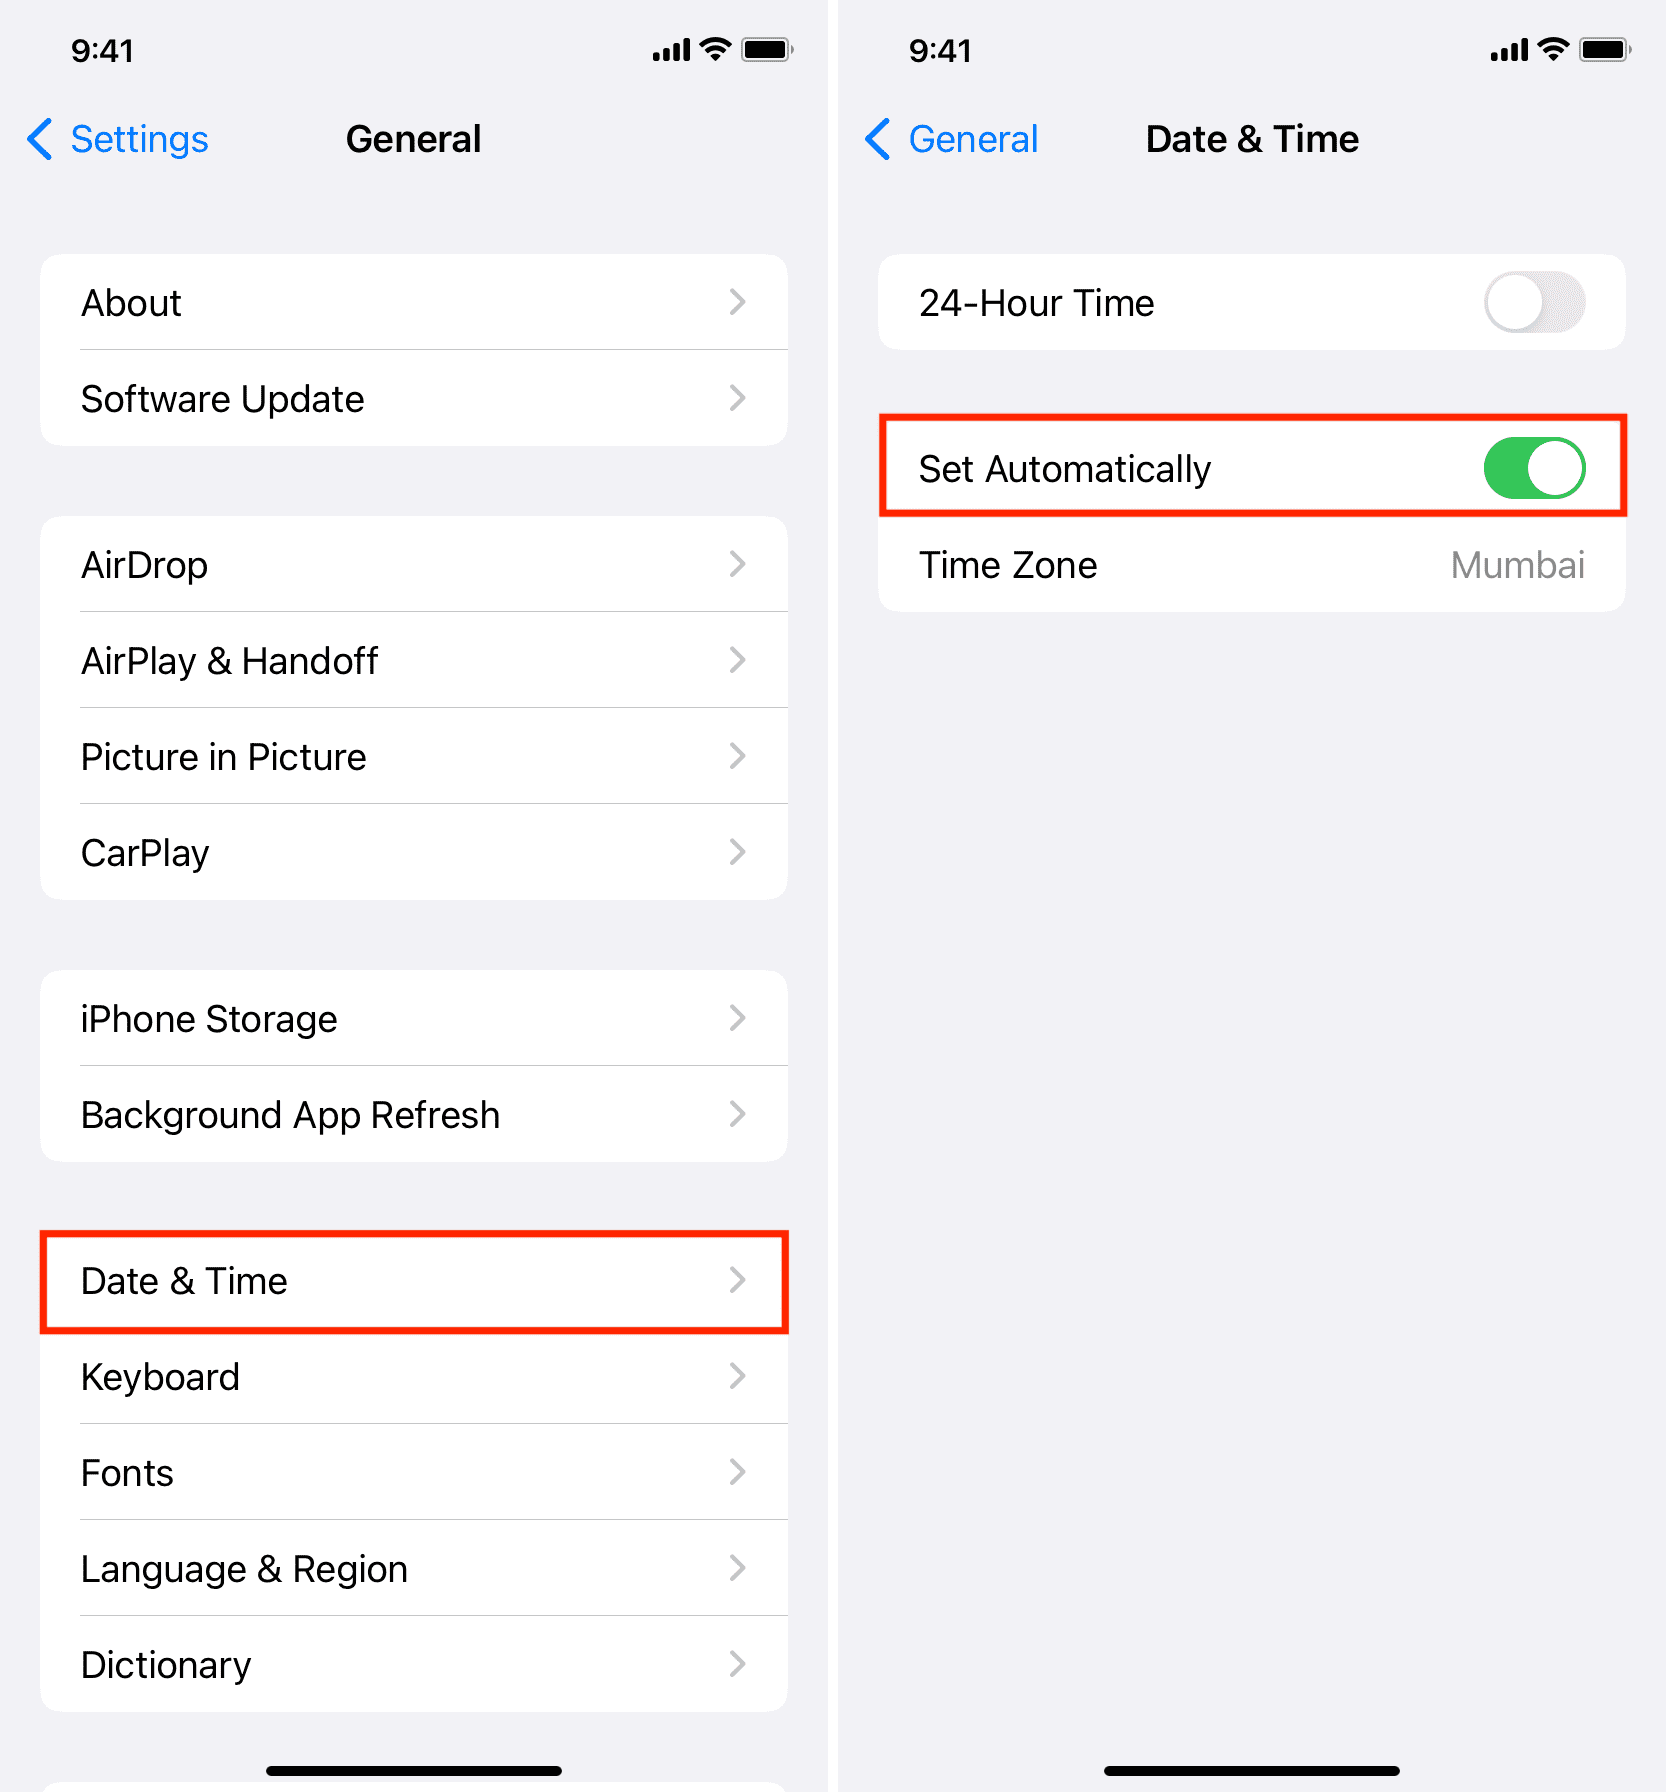
6) Automatické nastavenie dátumu a času
SSL certifikáty sú časovo citlivé. Nesprávny systémový čas môže viesť k chybám pri overovaní.
Ak to chcete opraviť, prejdite na
Nastavenia > Všeobecné > Dátum a čas
a povoliť
Nastaviť automaticky
.
7) Vymazať vyrovnávaciu pamäť Safari (ak sa v prehliadači zobrazí chyba)
Niekedy problém súvisí s certifikátom SSL uloženým v vyrovnávacej pamäti v prehliadači Safari.
- Prejsť na Nastavenia > Safari > Vymazať históriu a údaje webových stránok .
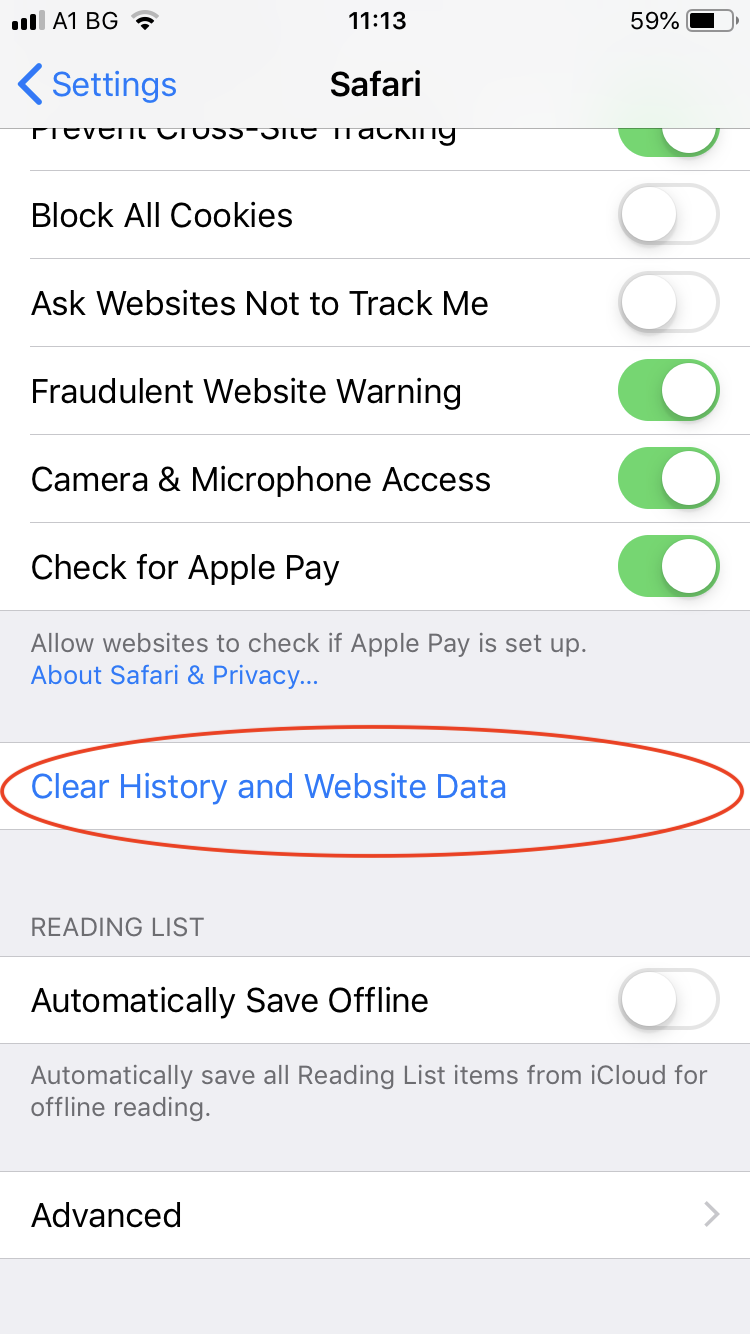
Týmto sa odstráni všetka história prehliadania, súbory cookie a certifikáty uložené vo vyrovnávacej pamäti.
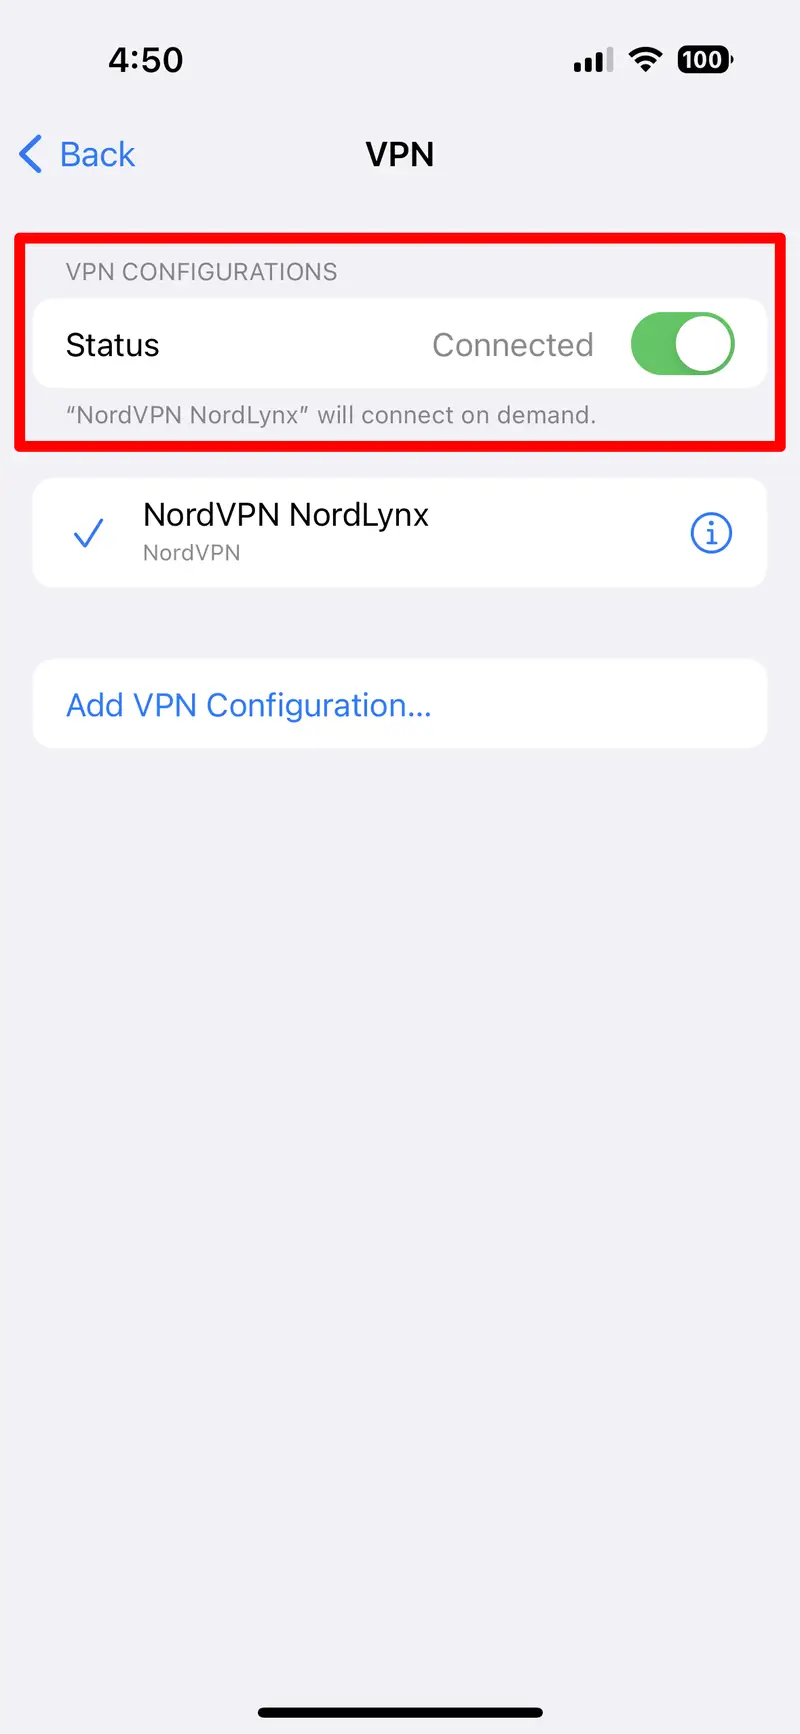
8) Vypnite VPN alebo vyskúšajte inú sieť
Ak ste pripojení k verejnej sieti Wi-Fi alebo používate VPN, tieto funkcie môžu blokovať alebo upravovať kontroly zabezpečených certifikátov.
Odpojte sa od verejnej siete a prepnite na mobilné dáta, potom prejdite na
Nastavenia > VPN
a vypnite všetky aktívne siete VPN.
9) Použite alternatívnu e-mailovú aplikáciu
Ak aplikácia Apple Mail naďalej zobrazuje chybu, vyskúšajte e-mailového klienta tretej strany:
- Microsoft Outlook
- Gmail
- Iskra
Tieto aplikácie často používajú rôzne metódy na spracovanie certifikátov servera a môžu problém obísť.
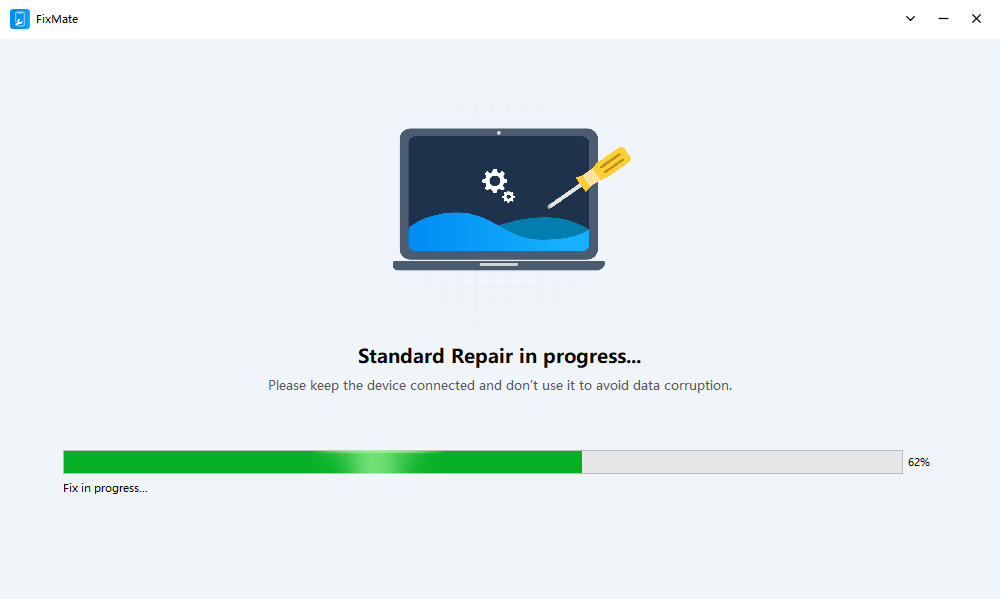
2. Pokročilé riešenie: Oprava chyby „Nedá sa overiť identita servera“ na iPhone pomocou AimerLab FixMate
Ak vyššie uvedené riešenia problém nevyriešia, váš iPhone môže trpieť hlbšou chybou na úrovni systému alebo poškodením systému iOS a tu prichádza na rad AimerLab FixMate.
AimerLab FixMate dokáže vyriešiť viac ako 200 problémov súvisiacich so systémom iOS a ponúka komplexné riešenie pre problémy, ako napríklad:
- Zaseknuté na logu Apple
- Slučky na topánky
- Zamrznutá obrazovka
- Chyby aktualizácie systému iOS
- Chyby „Nedá sa overiť identita servera“ a podobné chyby súvisiace s protokolom SSL alebo e-mailom
Podrobný návod: Oprava chyby „iPhone nedokáže overiť identitu servera“ pomocou nástroja AimerLab FixMate
- Prejdite na oficiálnu webovú stránku AimerLab, kde nájdete inštalačný program FixMate pre Windows a dokončite proces inštalácie.
- Otvorte FixMate a pripojte svoj iPhone pomocou kábla USB, potom vyberte režim štandardnej opravy, aby ste opravili svoj iPhone bez straty údajov.
- FixMate zistí model vášho iPhonu a zobrazí príslušnú verziu firmvéru pre iOS, kliknutím spustite proces.
- Po stiahnutí firmvéru kliknite na tlačidlo a potvrďte spustenie štandardnej opravy. Proces bude trvať niekoľko minút a po oprave sa váš iPhone reštartuje a bude fungovať normálne.
3. Záver
Chyba „Nedá sa overiť identita servera“ na iPhone môže byť rušivá, najmä ak vám bráni v prístupe k dôležitým e-mailom alebo webovým stránkam. Vo väčšine prípadov problém vyriešia jednoduché kroky, ako je reštartovanie telefónu, aktualizácia systému iOS alebo opätovné pridanie e-mailového účtu. Ak však tieto štandardné riešenia nefungujú, je pravdepodobné, že príčina sa skrýva hlbšie v systéme iOS.
A práve tu sa AimerLab FixMate ukazuje ako neoceniteľný. Vďaka štandardnému režimu môžete chybu opraviť bez straty jedinej fotografie, správy alebo aplikácie. Je rýchly, spoľahlivý a navrhnutý špeciálne na riešenie typov závad, s ktorými sa štandardné riešenie problémov nedokáže vysporiadať.
Ak váš iPhone napriek vášmu maximálnemu úsiliu naďalej zobrazuje chybu identity servera, nestrácajte čas stresovaním – stiahnite si
AimerLab FixMate
a nechajte ho obnoviť funkčnosť vášho iPhonu v priebehu niekoľkých minút.
- Prečo nemôžem získať iOS 26 a ako to opraviť
- Ako zobraziť a odoslať poslednú polohu na iPhone?
- Ako zdieľať polohu na iPhone prostredníctvom textovej správy?
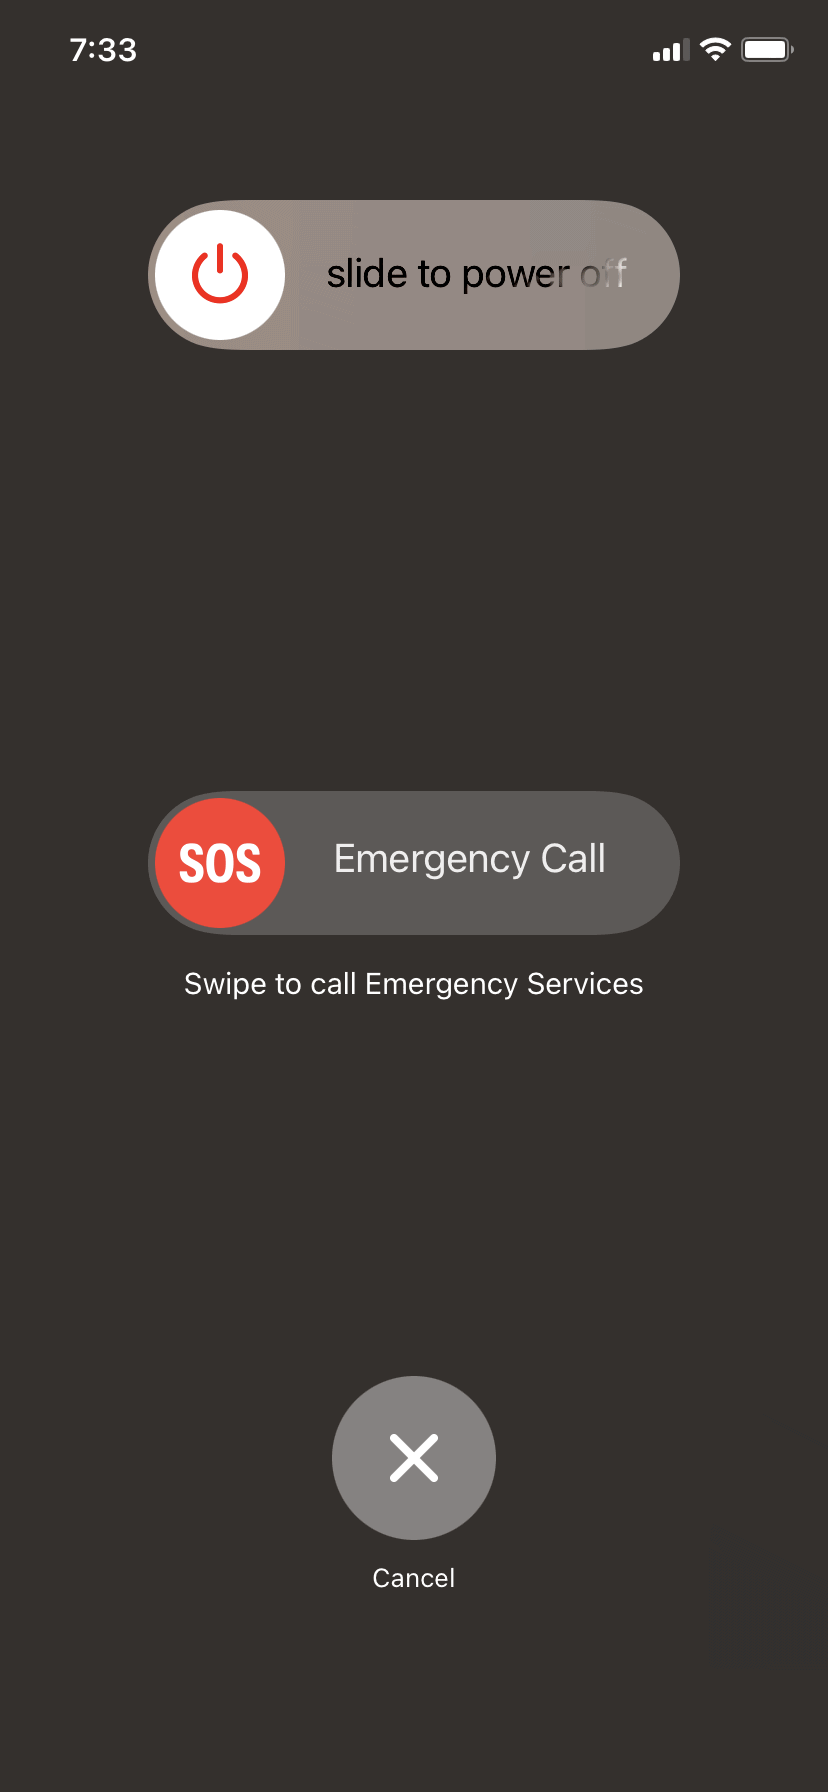
- Ako opraviť zaseknutie „Iba SOS“ na iPhone?
- Ako opraviť zaseknutie iPhonu v satelitnom režime?
- Ako opraviť problém s fotoaparátom iPhone, ktorý prestal fungovať?
- Ako sfalšovať Pokémon Go na iPhone?
- Prehľad spooferu polohy GPS Aimerlab MobiGo
- Ako zmeniť polohu na vašom iPhone?
- Top 5 falošných spooferov polohy GPS pre iOS
- Definícia vyhľadávača polohy GPS a návrh spooferov
- Ako zmeniť svoju polohu na Snapchat
- Ako nájsť/zdieľať/skryť polohu na zariadeniach so systémom iOS?